Fun with Ubuntu 7.04 (Feisty Fawn)!
Ubuntu 7.04 Features
- Migration Tool:
Windows migration tool - The new migration tool recognizes Internet Explorer favorites, Firefox bookmarks, desktop wallpaper, AOL IM contacts, Yahoo IM contacts and imports them in Ubuntu. This offers easier and faster migration for new users of Ubuntu and individuals wanting to run a dual partition. In addition to single accounts, you can migrate several users' settings in Ubuntu.

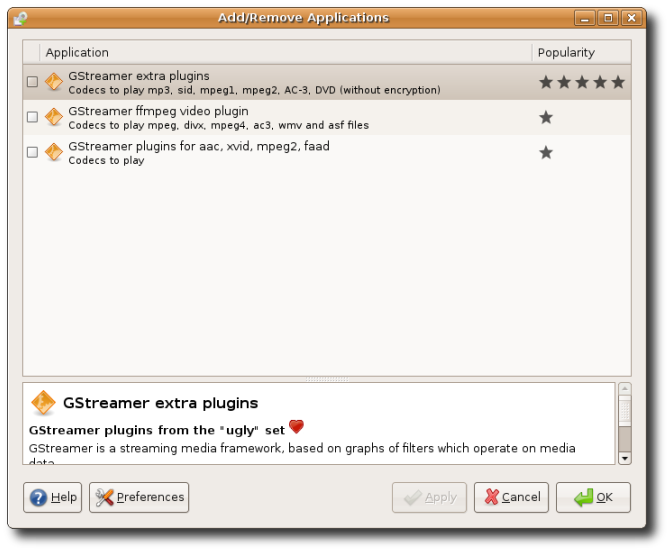
Easy installation of multimedia codecs:
Playing an MP3 or other media file just got a lot easier. If the required pieces are not yet installed, 7.04 will get the correct codecs for you, no more searching and no need for long and complicated instructions.
Desktop Effects
Stunning new desktop effects are available as a technology preview for users who choose to enable them. They remain turned off by default, for the benefit of users with older or less powerful chips and certain non-supported graphics cards.
Networking Improvements
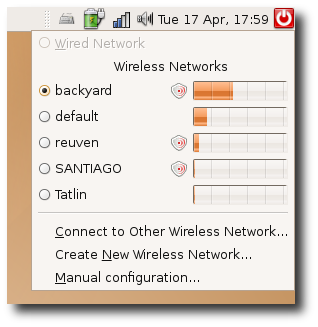
Easier connection to wireless networks
New in 7.04 is Network Manager, a simple way to find and connect to wireless and wired networks. With a single click, view all the available wireless networks and their strengths. For those on a secured network, WPA support is built in right out of the box.
Zeroconf for instant networks
For those times without a router or any existing network, 7.04 includes the ability to connect instantly, via Avahi, a free Zeroconf implementation. It allows programs to publish and discover services and hosts running on a local network with no configuration. It also allows easy connection to network printers, music shares, and much more.
Easier install of proprietary drivers
The new Restricted Drivers Manager allow users to easily install and manage proprietary drivers for wireless and video graphics cards and other hardware that may not have completely Free drivers.
New Artwork
Feisty features all new artwork; check out the new Desktop Background image, and a boot-up splash image that has more 'bling'. The new theme also includes a polished icon set.
Easy Third Party Installation
Installation of popular third party software has never been easier. With a click of a button you can now install Java, Flash and other commonly-requested applications.
Better debugging of crashes
For those times when programs crash, 7.04 builds in a new tool to catch the data about that crash and make certain all the right information gets to the developers, making a better Ubuntu experience for all.
Xorg 7.2 included
Keeping in step with the cutting edge mentality, X11R7.2, the third release of the modular X Window system, is utilized in this and future Feisty releases. X11R7.2 comes with significant stability and correctness fixes, including improved auto-configuration heuristics, enhanced support for GL-based compositing managers such as Compiz and Beryl, and improved support for PCI systems with multiple domains. It also incorporates the new, more extensible XACE security policy framework.
New Games: Sudoku and Chess
With a change of maintainers in gnome-games, the plea for new and more exciting games was heard. After two surveys, one to figure out which game to remove and another to determine to which one to add, two winners emerged: gnome-soduku and glchess. Both of these games have now been added to gnome-games 2.17 and you can find them under Applications > Games > Chess or Sudoku. Of course, one game did get axed. Sadly Ataxx, a game similar to Reversi and Othello, didn't make it.
Chess, GNOME style

Sudoku, GNOME style

Quick diagnostic tools
Disk Usage Analyzer allows you to easily view disk usage statistics in a more intuitive manner.
Disk analyzer

Help Center
In order to make Help more accessible, Feisty features a brand new Help Center with an easier to use interface that is more stylish.Support for more hardware, including Intel Macs
As with every new release, 7.04 comes with support for new hardware, including better support for laptops and newer peripherals. Printing support has also been updated, to support more features and newer printers.


Getting Ubuntu
and here's the mirror link for the same:
http://www.ubuntu.com/getubuntu/downloadmirrors
Put the Ubuntu CD you just burnt in your CD-ROM drive and reboot your PC. Ensure that you have selected CD-ROM as the first boot option in the BIOS. After rebooting your PC with the Ubuntu CD, you will get a cool looking boot screen. Just select the default option i.e. "Install/ Boot from CD" and press Enter. If everything goes well, you will get a cool looking Ubuntu desktop as shown below:

Installation
- Just click the "Install" icon on the desktop to start the Installation wizard. You will be greeted with the wonderful welcome screen:

- The installation wizard supports various languages. Just read the welcome message and release notes if you like and press the "Forward" button. On the next screen select your timezone and press the "Forward" button:

- Then, select your preferred keyboard layout:

- Next comes the most dreaded part of any GNU/Linux installation (especially for new users) i.e. partitioning. In Ubuntu partitioning has been greatly simplified and even newbies wouldn't find it too difficult. The basic requirement for partitioning is that you should either have some free space or an existing GNU/Linux partition on your hard disk. You should select manual partitioning only if you already know about partitioning in general and want to have complete control on your GNU/Linux installation. I chose manual partitioning as shown in the screen shot below:

- Next, you have to chose the partitions onto which your GNU/Linux installation would reside. The Ubuntu installation requires at least two partitions i.e. a root partition (/) and a swap partition. I had some free space in my hard disk for the root partition and an existing swap partition from another GNU/Linux installation as shown in the screen shot below:

- If you have a similar setup, highlight the free space and click "New Partition" to specify the partition size and mount point. Specify the partition type as "ext3" and mount point as "/" as shown in the screen shot below and press the "OK" button. Similarly create a swap partition by specifying the partition type as "swap" and partition size greater than or equal to the amount of your physical RAM. For example, if you have 1 GB RAM, create a swap partition of 2 GB. Recheck the partitioning screen to ensure that everything is correct and click the "Forward" button.

- Next comes the unique migration screen which is hard to find in other GNU/Linux distros. Here you can import your documents and setting from Windows or other existing GNU/Linux partitions.

- Next comes the user configuration screen. Here you have to specify the default user name and password for your GNU/Linux installation.

- Click Forward and you will be greeted with Installation summary page. Once you are satisfied with it press the Install button to begin installation.
Post Installation Tweaking
- Ultra low resolution after installation (640 x 480)
- Desktop Effects (3D desktop) disabled.
If you face the issues mentioned above, follow these simple steps:
- Setting the root password: At the Ubuntu grub boot menu, select the recovery option and press enter. After this, you will get the root terminal. Just use the 'passwd' command to set the new root password.
- Setting the correct resolution: Use the following command in the root terminal to set the correct resolution:
# dpkg-reconfigure xserver-xorg
Broadband Setup
- PPPoE mode
- Bridged mode
- Go to System->Administration->Network. In the "Connections" tab choose "Wired Connection", click properties and ensure that the configuration is "DHCP". In the DNS tab, add the DNS addresses provided by your service provider and click "Close".
- Try pinging your your router ip i.e. 192.168.1.1, 192.168.1.2 etc through a terminal.
- Then run the following command :
$ sudo pppoeconf
After this, run the following command to start your dialer:
$ sudo pon dsl-providerTo disconnect:
$ sudo poff dsl-providerAfter connecting (i.e. after running the pon command, try pinging any website from the terminal i.e. google.com). If you can ping it then your internet is connected!
You can also verify by pinging ur DNS server or by using the following command:
$ ifconfig ppp0The output should be like this:
ppp0 Link encap:Point-to-Point Protocol
inet addr:122.163.133.73 P-t-P: 202.56.215.135 Mask: 255.255.255.255
Enabling Desktop Effects


Ubuntu 7.04 ships with the Compiz 3D window manager by default. Compiz is a great way to experience awesome eye candy without doing any configurations whatsoever on Ubuntu. You just need to enable the "Desktop Effects" from the System menu as shown above.
Compiz is cool as fine as basic 3D effects are concerned, but if you want jaw-dropping 3D effects and want to experience the real next generation 3D effects, try Beryl. Beryl is a fork of Compiz and uses OpenGL to produce drop dead gorgeous 3D effects. Here are two alternate steps about installing and configuring Beryl on your Ubuntu desktop:
Graphical installation using Synaptic Package Manager
Follow these simple steps to install Beryl onto your Ubuntu installation. You will need a fast internet connection to download the required packages. The download size is approximately 7MB.
- Fire up the "Synaptic Package Manager" from "System->Administration->Synaptic Package Manager".
- Press the Search button and enter "Beryl" in the search box.
- After pressing the enter key, the Synaptic package manager would display all the Beryl packages. Right-click on a package and choose "Mark for Installation". Try to select the maximum number of Beryl packages from the list, so that you can get all the eye candy through Beryl plug-ins.
- Click on the Apply button to download and install the required Beryl packages.


Text based Installation
Instead of using the graphical Synaptic package manager, you can download the Beryl packages using these simple steps:
- Fire up a terminal and enter the following command:
sudo apt-get install beryl-ubuntu
- This will automatically install Beryl and its required dependencies onto your Ubuntu installation.
Now, comes the real part i.e. running our newly downloaded Beryl desktop. You can use either of the following methods for running Beryl:
Fire up a terminal and type the following command to start the Beryl 3D desktop:
$ beryl-manager
OR
Beryl has a plug-in architecture and provides a host of configuration options for customizing your 3D desktop. Here's a screen shot of the Beryl settings manager:
 Adding Beryl to Session Startup
So, you really liked the eye candy offered by Beryl and want to load it automatically every time with your Ubuntu desktop (GNOME). Follow these simple steps to add Beryl to session startup:
- Go to System->Preferences->Sessions
- In the "Startup Programs" tab, click the "New" button and type "beryl-manager" in the dialog box as shown below:


Here are some cool keyboard shortcuts for various Beryl effects:
- 3D Desktop Cube: Ctrl+Alt+(Arrow Keys), Ctrl+Alt+(Hold and drag left mouse button.
- Application Switcher with preview: Alt+Tab
- Ring application switcher: Super+Tab (for application switching on a single workspace, Super+Control+Tab (for application switching on all workspaces)
- Zoom functionality: Super+mouse scroll
- Transparency: Alt+mouse scroll
- Negative windows: Super+N (negative current application window), Super+M (Negative all application windows)
- View all applications together for easier workspace management: F8
- Rain Effects: Shift+F9
- Rainy mouse trail: Super+Ctrl+mouse move
- Snow Effects: Super+F3
Here are some screen shots from my system:


So, what are you waiting for? Pop-in that Ubuntu CD and begin the joy ride!


4 comments:
many thanks. havent tried it yet but it seems you made it so easy even a caveman should be able to do it :)
thanks again -- let you know how i made out
Thanks a lot for posting your feedback.
I'll surely be waiting for ur success news with Feisty Fawn :)
Thanks for the great post with screen shots. However, I recently tried Ubuntu installation with two major problems:
1. The migration tool doesn't find anything from my Windows partition.
2. Even worse, Grub installation failed, giving a fatal error, and linux installation exited :(
My setup: Dell 6400 laptop with ATI x1300 (which itself is a problem, had very difficult time getting X server working), 120GB HD, with 20GB free space, 40GB data drive, 30GB XP and 30GB Vista.
Seems like Grub couldn't install properly on hdr0.
Any help would be so welcome. If you would like to give any advice, plz email me on harshpshah@gmail.com
harsh, u could try running Ubuntu thru the Live CD. Does it work thru a live CD?
Post a Comment